Sunday, March 24, 2013

cheddar jalapeno bagels w/sun-dried tomato + herb cream cheese spread

I'm not sure what planet I've been on lately. Perhaps one where I'm too busy spending all my money and forgetting I have a blog to tend to or something. My bad.

But to make it up to you (by you I mean whatever loyal, occasional, or drive-by followers I may have), I will share this recipe. Bagels. Wait, let me rephrase that. Cheddar jalapeno bagels. Wait wait, there's more. Sun-dried tomato and herb cream cheese. Oh yes, this is next level Sunday Brunch. Whip up a mimosa with this and you're good to go. Okay, allow me to introduce you to a flavor explosion..

Cheddar Jalapeno Bagels
Yields 8 Bagels

INGREDIENTS
3 1/2 cups bread flour
1 1/2 tsp salt
1 1/4 cup lukewarm water
1 1/2 Tbsp white granulated sugar
2 tsp (1 packet) active dry yeast
1/4 cup room temp water
1 cup shredded cheddar cheese
1/2 cup diced jalapenos (I eliminated the ribs and seeds of the jalapeno to keep the bagel itself pretty mild)
1 egg, lightly beaten
topping: extra shredded cheddar cheese, jalapeno slices (for the slices I cut straight down into the ribs and seeds which will add a spicy kick to the top)

DIRECTIONS
1. In a medium mixing bowl, whisk together bread flour and salt. Set aside.
2. In a liquid measuring cup with lukewarm water, dissolve sugar. Then add yeast. Do not stir. Allow yeast to bloom-- this will take about 5-7 minutes.
3. Once yeast has bloomed, make a well in the dry ingredient mixing bowl. Gradually add water and yeast mixture into the well. Use a fork to incorporate the dry with the wet. At this point, it will look kind of shaggy and super dry. 
4. Turn out the dough onto a flat surface. Begin kneading the dough. Add some of the reserved room temp water to help moisten the dough if necessary. I ended up using about 1/4 cup, but add more or less as needed. Knead for about 7-8 minutes until the dough is relatively smooth and elastic. If you punch your finger into it, the dough should spring back. At this point, slightly flatten the dough, add diced jalapenos and shredded cheddar cheese to center. Fold the dough over and knead everything together for a couple more minutes until it looks like the jalapeno pieces and cheese are distributed well.
5. Dust out any leftover dry that may have stuck to the sides of your medium mixing bowl. Lightly grease that same bowl with olive oil. In order to avoid over-greasing, I pour just a little bit onto my fingertips, then spread into the bowl.
6. Place the dough back into the greased bowl and allow to rise for about 1 hour in a warm spot. It's ready when it looks like it has doubled in size.
7. Dust a little bread flour onto your flat surface. Flip the dough out of the bowl. Divide the dough into 8 equal pieces. The best way to do this is to cut it like a pie.
8. Shape each section into a round ball. Use your finger to make a hole in the middle. Then set aside onto a large parchment-lined baking sheet. Allow the shaped bagels to rest on the baking sheet for about 5 minutes. 
9. Preheat the oven to 425 degrees F.
10. In a large pot of boiling water, boil the bagels--about 45 seconds to 1 minute on each side. You can boil the bagels in batches depending on the size of your pot. I was able to fit about 3 or 4 at a time. Remove the bagels from the boiling water and set back onto the parchment-lined baking sheet.
11. Brush an egg wash (the light beaten egg) onto the tops/sides of all the bagels. Add extra shredded cheddar and sliced jalapenos to the tops (I might have also added a little Parmesan also because I was low on cheddar.)
12. Bake for 20 minutes until the tops are golden brown.


Sun-Dried Tomato and Herb Cream Cheese Spread

INGREDIENTS
8oz. regular cream cheese spread (full fat, low fat, whatever you deal with)
1 Tbsp + 1 tsp roughly chopped fresh parsley
1 Tbsp + 1 tsp roughly chopped fresh basil
1 Tbsp + 2 tsp chopped sun-dried tomatoes, drained

DIRECTIONS
1. Place all ingredients in a bowl and mix together well with a spatula.
2. Once all the ingredients are evenly combined, use the spatula to transfer the cream cheese mixture to a nice dipping bowl. Or do as I do-- throw it all back into the cream cheese container. Top with extra chopped herbs and/or sun-dried tomato if you like.
3. Done! Put the lid back on the cream cheese container and refrigerate any leftover.

 I really need to start hosting Sunday Brunch..
.. because, seriously, this platter is so share-worthy.
I had brunch by myself but that's okay. It was still scrumptious. Totally hit the spot. Nom.
(p.s. do you see that melted cheddar in the middle?! ^^ YUM.)

Tuesday, March 12, 2013

chambray + rose gold

I know it looks like I curl my hair all the time and it's because I do. My hair is getting so long and I have no idea what to do with it these days. I haven't gotten it cut yet, because I'm still wavering on whether I should just get it trimmed and styled.. Or donate again to the Pantene Pro-V Beautiful Lengths Program. Regardless, right now, it's just too hard to wear it straight. So, instead, I pulled it up into a bun today. My curling iron needed a break anyway.

 shirt: Madewell || leggings: Stylemint || earrings: BaubleBar
 necklace: BaubleBar Rose Oversized Link Strand
rings: Gorjana Shimmer Disc Chain Ring in Rose Gold and BaubleBar Rose Gold Link Ring (in silver here)

Sunday, March 10, 2013

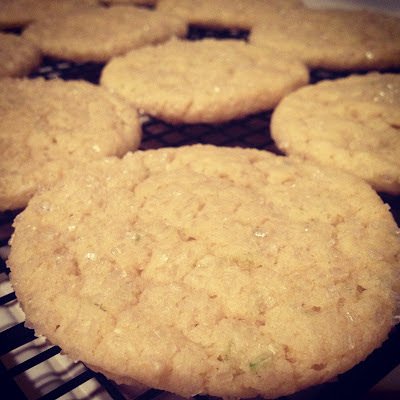
key lime sugar cookies

I don't even care that Martha Stewart went to jail. I freakin love her.. and her kitchen. Anyway, I've been storing a MS lemon sugar cookie recipe on my Pinterest recipe board for forever. I didn't have lemons. Not to worry, I know how to improvise. These are so chewy and good. Honor my girl, Martha, and make these right away.

Key Lime Sugar Cookies
Adapted from Martha Steward Living
Yields about 3 dozen cookies

INGREDIENTS
3 cups all-purpose flour
1 tsp baking soda
1/4 tsp salt
1 cup unsalted butter (2 sticks), softened
1 3/4 cups white granulated sugar
1/4 cup packed light brown sugar
1 Tablespoon finely grated key lime zest
1 Tablespoon freshly squeezed key lime juice
2 large eggs

coarse sparkling sugar for sprinkling

DIRECTIONS
1. Preheat oven to 350 degrees F. Line baking sheets with parchment paper.
2. In medium bowl, whisk together dry ingredients-- flour, baking soda, and salt.
3. In a stand mixer fitted with a paddle attachment, beat butter on medium speed for about 1 minute until even consistency. Add white granulated sugar, light brown sugar, and lime zest. Beat until pale and fluffy. Scrape down the bowl and paddle with a spatula and beat for 1-2 more minutes.
4. Beat in the eggs one at a time. Then beat in the lime juice. Scrape down the bowl and paddle, and beat again until even consistency.
5. On the stir speed, add the dry mixture to the wet mixture. Stir only until everything is just incorporated.
6. Use a spoon or a small ice cream scoop to portion out 1 to 1 1/2-inch rounded balls. Roll each dough ball in sparkling sugar, then place onto parchment-lined baking sheet. Make sure they are space about 1 1/2 to 2 inches apart on the baking sheet.
7. Bake for 7 minutes. Rotate baking sheet. Then bake for an additional 8 minutes. 
8. Remove baking sheet from oven. Allow cookies to cool directly on the baking sheet for at least 2-3 minutes. Then with a spatula, transfer cookies to wire cooling rack.
9. Eat, share, save for later.

Thursday, March 7, 2013

vanilla dipped chocolate cake cookies

These are the easiest "black and white" cookies ever. I made the batter, baked the cookies, and dipped them all in less than 1 hour. Not kidding. And then the whole batch was demolished in about 5 minutes.

Okay, you know that emergency boxed cake mix sitting on the shelf? (You can stop judging me because you thought I was better than that. I'm not. In fact, I have one-- usually two-- at all times.) Well, this is where that premade cake mix will come in handy. And it will become something totally different than what's instructed on the back of the box, so I think it's totally acceptable.

Dipped Chocolate Cake Cookies

INGREDIENTS
1 package chocolate cake mix (I used Devil's Food cake mix)
1/2 cup butter, softened
1 egg
1 1/2 cups vanilla, white candy melts wafers
1/4 cup rainbow nonpareils sprinkles

DIRECTIONS
1. Preheat oven to 350 degrees F. Line a couple baking sheets with parchment paper.
2. In a stand mixer fitted with a paddle attachment, beat the butter on medium speed until even consistency. Then add the egg and cake mix until everything is well incorporated and there is no visible dry.
3. Portion 1 to 1 1/2-inch balls of dough onto the lined baking sheets, spacing them about 2 inches apart. I use an small ice cream scoop to make this easy.
4. Bake for 10 minutes, rotating in between. 
5. When the cookies are done, allow to cool on the baking sheet for about 3-5 minutes. Then transfer cookies to a wire cooling rack.
6. While the cookies are cooling, place the candy melts into a microwavable bowl. Melt by heating in 30 second intervals, stirring after each heating. When the candy melts are almost melted (still a little lumpy), stir for a longer amount of time until melted completely. This will help to overheating the candy melts. 
7. Dip the cooled cookies halfway into the vanilla candy melts. Immediately sprinkle the rainbow nonpareils sprinkles-- as little or as much as you like!
8. Place cookies back onto the cooled parchment-lined baking sheet. The candy coating will harden and set. To quicken the process, you can pop them into the refrigerator for 2-3 minutes.
9. Then they are ready to eat! They can also be stored in an airtight container for up to a week.


What's awesome about these cookies is you can use your favorite cake mix and candy melt flavors. The vanilla candy melts taste just like white chocolate. But white chocolate can be a fussy. Candy melts are designed to be melted down, altered, and quickly harden back into their solid form. I used the rainbow nonpareils, but you can use pretty much anything that can be broken down into small crumbs-- think Oreos, graham crackers, etc. Just go for it. And have fun!

Monday, March 4, 2013

black and white, chocolate chip banana bread

I had to put the comma in between "white" and "chocolate", as not to mislead you to believe this includes white chocolate. White chocolate and banana? I'm sorry, but ew.

Instead, slices of this banana bread resemble those adorable black and white cookies. Well, I suppose this is more like black and yellow. Whatever. 1/2 chocolate banana (the black) and 1/2 banana chocolate chip (the chocolate studded white)-- make this only if you want trick people into thinking you are a super awesome baker without having to do much.

Black and White, Chocolate Chip Banana Bread
Yields 1 loaf

INGREDIENTS
1 1/2 cups all-purpose flour
3/4 cup white, granulated sugar
1 tsp baking soda
1/2 tsp salt
2 large eggs, lightly beaten
1/4 cup canola oil
1 cup mashed ripened banana
1/2 cup semisweet chocolate chips
1/4 cup unsweetened Dutch-processed cocoa powder, sifted

DIRECTIONS 
1. Preheat oven to 350 degrees F. Grease a loaf pan with non-stick cooking spray.
2. In a medium mixing bowl, stir together dry ingredients-- flour, sugar, baking soda, and salt. Set aside.
3. In a separate bowl, combine eggs, oil, and mashed banana. Add wet mixture to dry mixture. Use a wooden spoon or spatula to gently stir everything together until just incorporated. There should not be any visible "dry".
4. Reserve about 1/3 of the mixture by pouring back into the "wet" bowl. 
5. To the other 2/3 of the mixture, fold in chocolate chips. Then, pour this chocolate chip mixture into the greased loaf pan. Use the spatula to spread out this layer as evenly as possible.
6. To the reserved 1/3 banana mixture, stir in the unsweetened Dutch-processed cocoa powder. It will look like a thick, gooey chocolate batter.
7. Add the chocolate banana batter to the loaf pan, on top of the chocolate chip banana layer. You can use a spatula again to spread the chocolate layer. Or, with a knife, I use the sharp point to "cut" into the top layer and swirl around until it looks about even. This will give a pretty marbled look on top.
8. Bake in the preheated oven for about 1 hour or until a toothpick comes out clean.
9. Then remove loaf pan from the oven and allow to cool for about 10-15 minutes. the loaf should start pulling away from the pan as it cools. Flip the banana bread loaf out of the pan and then sit it right-side up again to finish cooling. If it is too warm, it might crumble as you do this. The longer you allow the banana bread to cool in the pan, the easier it will be to flip out.
10. When mostly cooled, slice with a sharp knife/ bread knife and serve.
11. Wrap whatever you do not eat with plastic wrap. This can also be frozen for up to 3 months.

Friday, March 1, 2013

psst.. how to have an amazing hair day

I've accumulated a bajillion different hair product samples. Okay, I know bajillion isn't a real number but, you get the point, I have a lot. Between sample boxes and free samples with purchases, I have kind of an overflow. They do come in handy when I'm trying to switch up my haircare routine. I'm not the type of person who would ever buy a whole bottle without testing it out first.

Around Valentine's Day, BaubleBar had a free gift with purchase promotion. Thanks to my addiction to baubles, I was able to snag the Rahua Jetsetter Kit and the Amika Blow Up Spray. My hair is long, thick, and extremely temperamental at times. It's hard to give my mane volume and shine without drowning it in product. Therefore, it takes a lot to impress me when it comes to this stuff. Well, it looks like the BaubleBar team not only knows how to pick out the best sparkle but also knows a thing or two about hair. All I have to say is OMG, THANK YOU! My hair is forever grateful.

With the Rahua shampoo and conditioner, my hair finally feels CLEAN. Other shampoo and conditioners leave my hair somewhat filmy-- like it's never really completely washed out. Rahua is 100% natural and I'm 100% sold on this brand. While my hair was still damp, I misted it with the Amika Blow Up Spray. What's great about this product is that it doubles as a heat protector-- always a plus. After blow drying, I noticed significantly less fly aways. For the first time in a long time, I felt like my locks looked sleek and shiny. I can't tell which product is responsible for this newfound hair swoon. Perhaps it's the combination of the two. Magic, I tell ya.

My hair looked so good, I considered stopping there and leaving it straight. But ultimately, I ended up curling it like I do 6 out of the 7 days of the week. I finished styling with another new product I'm trying out-- Not Your Mother's She's a Tease Volumizing Hairspray. More on this later.

 tee: NYC Paris ||  jacket: J Brand || jeans: Blank NYC || necklace: BaubleBar Silver Weave Bib || bracelets: Gorjana (Suede Studded Wrap + Parker Leather Wrap in Neon Yellow) and Sequence (Spice Knot Bracelet + One Soul Bracelet)